Battery switch on travel trailer function is crucial for managing your RV’s power. Understanding how your battery switch works is key to preventing electrical problems and ensuring a smooth camping experience. This guide will walk you through the different types of switches, their proper use, troubleshooting common issues, and how they integrate with other RV systems. We’ll cover everything from location and accessibility to safety precautions and maintenance tips, empowering you to confidently manage your travel trailer’s power.
Whether you’re a seasoned RVer or a newbie, this comprehensive guide will equip you with the knowledge to safely and efficiently operate your travel trailer’s battery system. We’ll delve into the intricacies of different switch types, their internal mechanisms, and the best practices for maintenance to ensure your electrical system remains reliable and trouble-free.
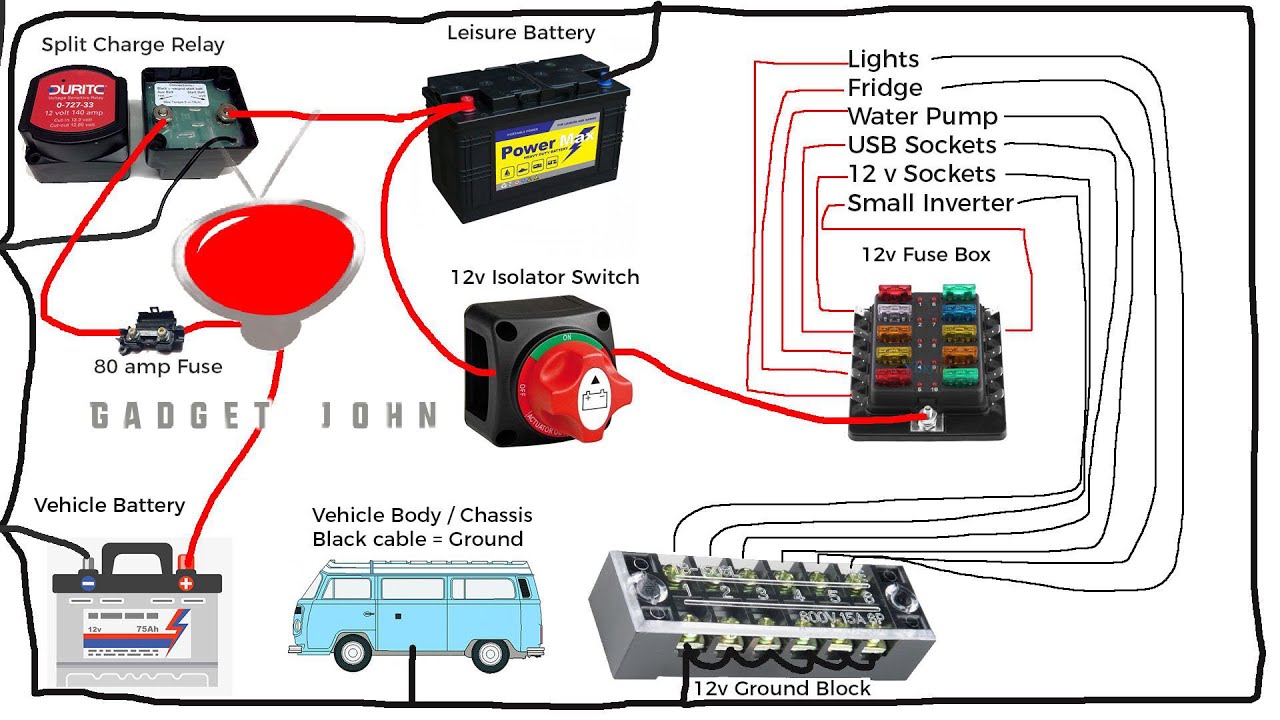
Types of Battery Switches in Travel Trailers
Choosing the right battery switch for your travel trailer is crucial for managing your power sources efficiently and safely. Understanding the different types available will help you make an informed decision based on your needs and setup. This section details the common types, their inner workings, and their relative advantages and disadvantages.
So, you’re planning a trip? Awesome! First things first: get travel insurance. Seriously, check out Aon travel insurance – they’ve got options for every kind of adventure. And while you’re sorting out the practical stuff, don’t forget the fun! If you’re an audiophile, consider building a killer audiophile travel setup for those long journeys.
Good tunes make any trip better, right?
Battery Switch Types and Their Internal Mechanisms, Battery switch on travel trailer function
Travel trailers typically use battery switches to isolate or combine different battery banks (e.g., house batteries and starting battery). These switches prevent accidental drain from one bank to another and allow for controlled charging and usage. Let’s examine the common types.
So, you’re planning a trip? Awesome! First things first: get yourself sorted with travel insurance. Check out Aon travel insurance for some solid options; they’ve got you covered for most eventualities. And since you’ll be away, you might want to consider your entertainment – if you’re an audiophile, building a killer audiophile travel setup is key to enjoying those long journeys.
Do your research and make sure you’re prepared for a smooth and enjoyable trip!
| Switch Type | Internal Components | Advantages | Disadvantages |
|---|---|---|---|
| 1-2-Both | This switch uses a rotary mechanism with internal contacts. In the “1” position, it connects only the first battery bank to the load. “2” connects only the second battery bank. “Both” connects both banks in parallel. A simple spring-loaded mechanism moves the contacts. | Simple operation, inexpensive, widely available. | Can be prone to wear and tear over time, especially with high current loads. May have higher contact resistance than more sophisticated switches, leading to slightly reduced efficiency. |
| 1-2-Off | Similar to the 1-2-Both switch, but with an “Off” position that completely disconnects both battery banks from the load. | Provides complete isolation of the batteries when not in use, preventing parasitic drain. | Similar wear and tear issues as the 1-2-Both switch, particularly under high current demand. |
| Perko Switches (and similar) | These switches often employ a more robust design with multiple internal contact points and a stronger mechanical mechanism. They frequently incorporate a more positive locking mechanism in each position, reducing the chance of accidental switching. | Increased durability and reliability compared to simpler rotary switches. Better current handling capacity, leading to less voltage drop. | Generally more expensive than simpler 1-2-Both or 1-2-Off switches. |
| Electronic Battery Isolators/Combiners | These are not strictly switches in the traditional sense. They use electronic circuitry to automatically combine or isolate batteries based on voltage levels and charging states. | Automatic operation, preventing accidental discharge. Often have better charging efficiency compared to mechanical switches. Can protect batteries from over-discharge. | More complex and potentially more expensive than mechanical switches. May require additional wiring and installation. |
Switch Performance Under Various Conditions
The performance and reliability of different battery switches vary depending on the conditions. Simpler rotary switches (1-2-Both, 1-2-Off) can be less reliable under high current draw situations, such as running an air conditioner or microwave, due to increased heat generation and potential for contact degradation. This can manifest as voltage drop or even failure of the switch. More robust switches, like Perko switches or electronic isolators, generally handle high current draws better, offering more consistent performance and longer lifespan.
Prolonged use, particularly in harsh environments, can affect all switch types, with simpler designs showing more wear and tear faster. For example, constant exposure to moisture or vibration can accelerate corrosion and mechanical failure in rotary switches. Electronic isolators are generally less susceptible to environmental factors but can be affected by extreme temperatures.
Battery Switch Location and Accessibility: Battery Switch On Travel Trailer Function

Finding your travel trailer’s battery switch is crucial for both routine maintenance and emergency situations. Knowing its location and ensuring easy access can prevent frustrating delays and potentially dangerous scenarios. A well-placed switch makes disconnecting your batteries quick and simple, protecting your RV’s electrical system and ensuring your safety.Knowing where your battery switch is located is essential for safe and efficient operation of your travel trailer.
Easy access allows for quick disconnection in emergencies, preventing potential damage or injury. Conversely, a poorly located switch can lead to unnecessary complications and safety hazards.
Common Battery Switch Locations
Several common locations exist for battery switches in travel trailers. Understanding these locations can help you quickly find yours, saving valuable time in emergencies. 
Caption: This image depicts a typical battery switch housed within a weatherproof compartment near the trailer’s batteries. Notice the clear labeling and easy access to the switch. The compartment door is typically secured with a latch or screws, protecting the switch from the elements and accidental activation.

Caption: This illustration shows a battery switch mounted inside a storage compartment, often located near the tongue of the trailer. While convenient for access, ensure this compartment is kept dry and free of debris to prevent damage to the switch and surrounding electrical components. The proximity to the batteries minimizes the length of the wiring run, reducing voltage drop.

Caption: This image displays a battery switch located on or near the main control panel inside the travel trailer. This location offers easy access from within the RV, ideal for quickly disconnecting the batteries during emergencies or before extended periods of storage. However, this position might require additional cable routing and could be more susceptible to damage if the control panel is subject to impacts.
Importance of Accessibility
Easy access to the battery switch is paramount. Quick disconnection is vital in emergencies, such as a fire or electrical short, preventing further damage and potential injury. Regular maintenance, like checking battery terminals and connections, is also significantly easier with a readily accessible switch.
Safety Hazards of Inaccessible Switches
An inaccessible battery switch presents several safety hazards. In an emergency, the delay in locating and accessing the switch can worsen the situation, potentially leading to more extensive damage or increased risk of injury. A poorly placed switch, such as one hidden behind heavy equipment or in a difficult-to-reach location, can increase the risk of accidental contact with the switch, resulting in electrical shock.
Furthermore, a switch located in a damp or poorly ventilated area may corrode, leading to malfunction and potential fire hazards.
Mastering your travel trailer’s battery switch is essential for a worry-free camping experience. By understanding the different switch types, their proper operation, and common troubleshooting techniques, you’ll be well-prepared to handle any electrical situation. Remember regular maintenance and safety checks are key to preventing issues and ensuring your RV’s electrical system remains in top condition. Happy travels!
Questions Often Asked
What happens if my battery switch is left in the wrong position?
Leaving the switch in the wrong position can lead to battery drain, damage to electrical components, or even a fire hazard. Always ensure it’s correctly positioned according to your needs.
How often should I inspect my battery switch and connections?
Inspect your battery switch and connections at least every three months, or more frequently if you use your RV regularly or live in a humid climate. Look for corrosion, loose connections, and any signs of damage.
Can I replace my battery switch myself?
While possible, replacing a battery switch requires some electrical knowledge. If you’re unsure, it’s best to consult a qualified RV technician to avoid damaging your RV’s electrical system.
Why is my battery draining even when the switch is off?
A draining battery despite the switch being off could indicate a parasitic drain, a faulty switch, or a problem with other electrical components. Thoroughly inspect the connections and consider seeking professional help.
